Hexo 集成 Algolia 实现站内搜索
前言
虽然现在博客文章还不多,但没有搜索功能找起文章来还是很费力。
对于 Hexo 里的搜索,我也找了一下有插件可以实现本地搜索,也可以集成 Swiftype ,但免费试用后又要收费,所以这次干脆直接接入 Algolia。
Algolia 介绍
Algolia 是一款托管的搜索引擎服务,它提供了快速、实时的搜索功能。
它的核心组成部分包括记录(record)、索引(index)和搜索(search)。
记录是搜索和展示的数据,可以是文本、图片或其他格式的内容。
索引是记录的集合,可以理解成是一个库。
搜索是指使用 Algolia 提供的 API 对索引中的记录进行搜索并返回与搜索关键字相关的最佳匹配结果。
首先,你需要一个账号,自行注册一下哈。
DocSearch
如果你的博客是纯技术博客且公开,只想要个搜索功能,也对自定义功能等不太感兴趣,能改改 UI 颜色就行,那可以直接申请使用 Algolia 下的 DocSearch。
各大开源框架官网都在用,就是这个全文文档搜索。
申请要求
- 技术文档或技术博客
- 网站的所有者,或至少有更新其内容的权限
- 网站必须是公开的
- 必须已上线且有内容
我只等了一天就通过了申请,非常有效率。
根据邮件内容,加入受邀的应用,接入 css 和 js 就完成了。

接入
在主题下的 _config.yml 添加配置项
doc_search:
  enable: true
  appId: appId
  apiKey: apiKey
  indexName: indexName
  insights: true
  container: '#docsearch'
  debug: false
添加代码
PS. 我这里为了好理解所以都写在了一起,具体要根据自己的主题和 layout 动态调整。
if theme.doc_search.enable == true
	//- 搜索框 DOM
	#docsearch

	//- 加载 css
	link(rel='stylesheet' href='https://cdn.jsdelivr.net/npm/@docsearch/css@3')

	//- 加载 js
    script(src='https://cdn.jsdelivr.net/npm/@docsearch/js@3')

    //- 初始化
    script.
                docsearch({
                    appId: '!{ theme.doc_search.appId }',
                    apiKey: '!{ theme.doc_search.apiKey }',
                    indexName: '!{ theme.doc_search.indexName }',
                    insights: '!{ theme.doc_search.insights }',
                    container: '!{ theme.doc_search.container }',
                    debug: '!{ theme.doc_search.debug }',
                });
docsearch 所有配置项见 👉🏻 官网 API 说明
样式
可以通过 @docsearch/css 提供的 CSS 变量来自定义样式
:root {
  --docsearch-primary-color: rgb(84, 104, 255);
  --docsearch-text-color: rgb(28, 30, 33);
  --docsearch-spacing: 12px;
  --docsearch-icon-stroke-width: 1.4;
  --docsearch-highlight-color: var(--docsearch-primary-color);
  --docsearch-muted-color: rgb(150, 159, 175);
  --docsearch-container-background: rgba(101, 108, 133, 0.8);
  --docsearch-logo-color: rgba(84, 104, 255);

  /* modal */
  --docsearch-modal-width: 560px;
  --docsearch-modal-height: 600px;
  --docsearch-modal-background: rgb(245, 246, 247);
  --docsearch-modal-shadow: inset 1px 1px 0 0 rgba(255, 255, 255, 0.5), 0 3px 8px 0 rgba(85, 90, 100, 1);

  /* searchbox */
  --docsearch-searchbox-height: 56px;
  --docsearch-searchbox-background: rgb(235, 237, 240);
  --docsearch-searchbox-focus-background: #fff;
  --docsearch-searchbox-shadow: inset 0 0 0 2px var(--docsearch-primary-color);

  /* hit */
  --docsearch-hit-height: 56px;
  --docsearch-hit-color: rgb(68, 73, 80);
  --docsearch-hit-active-color: #fff;
  --docsearch-hit-background: #fff;
  --docsearch-hit-shadow: 0 1px 3px 0 rgb(212, 217, 225);

  /* key */
  --docsearch-key-gradient: linear-gradient(-225deg, rgb(213, 219, 228) 0%, rgb(248, 248, 248) 100%);
  --docsearch-key-shadow: inset 0 -2px 0 0 rgb(205, 205, 230), inset 0 0 1px 1px #fff, 0 1px 2px 1px rgba(30, 35, 90, 0.4);

  /* footer */
  --docsearch-footer-height: 44px;
  --docsearch-footer-background: #fff;
  --docsearch-footer-shadow: 0 -1px 0 0 rgb(224, 227, 232), 0 -3px 6px 0 rgba(69, 98, 155, 0.12);
}
爬虫调试
如果默认生成的索引不全,可以自行修改爬虫 crawls 配置,重新抓取。
以下是一个爬虫示例(参考了 VitePress)
new Crawler({
appId: 'YOUR_APP_ID',
apiKey: 'YOUR_API_KEY',
rateLimit: 8,
startUrls: [
// 这是 Algolia 开始抓取网站的初始地址
// 如果你的网站被分为数个独立部分,你可能需要在此设置多个入口链接
'https://YOUR_WEBSITE_URL/'
],
sitemaps: [
// 如果你在使用 Sitemap 插件 你可以提供 Sitemap 链接
'https://YOUR_WEBSITE_URL/sitemap.xml'
],
ignoreCanonicalTo: false,
exclusionPatterns: [
// 你可以通过它阻止 Algolia 抓取某些 URL
],
discoveryPatterns: [
// 这是 Algolia 抓取 URL 的范围
'https://YOUR_WEBSITE_URL/**'
],
// 爬虫执行的计划时间,可根据文档更新频率设置
schedule: 'at 02:00 every 1 day',
actions: [
// 你可以拥有多个 action,特别是你在一个域名下部署多个文档时
{
// 使用适当的名称为索引命名
indexName: 'YOUR_INDEX_NAME',
// 索引生效的路径
pathsToMatch: ['https://YOUR_WEBSITE_URL/**'],
// 控制 Algolia 如何抓取你的站点
recordExtractor: ({ $, helpers }) => {
// @vuepress/theme-default 的选项
return helpers.docsearch({
recordProps: {
lvl0: {
// 标题选择器
selectors: '',
defaultValue: 'Documentation'
},
lvl1: '.theme-default-content h1',
lvl2: '.theme-default-content h2',
lvl3: '.theme-default-content h3',
lvl4: '.theme-default-content h4',
lvl5: '.theme-default-content h5',
lvl6: '.theme-default-content h6',
content: '.theme-default-content p, .theme-default-content li'
},
indexHeadings: true
})
}
}
],
initialIndexSettings: {
// 控制索引如何被初始化,这仅当索引尚未生成时有效
// 你可能需要在修改后手动删除并重新生成新的索引
YOUR_INDEX_NAME: {
attributesForFaceting: ['type', 'lang'],
attributesToRetrieve: ['hierarchy', 'content', 'anchor', 'url'],
attributesToHighlight: ['hierarchy', 'hierarchy_camel', 'content'],
attributesToSnippet: ['content:10'],
camelCaseAttributes: ['hierarchy', 'hierarchy_radio', 'content'],
searchableAttributes: [
'unordered(hierarchy_radio_camel.lvl0)',
'unordered(hierarchy_radio.lvl0)',
'unordered(hierarchy_radio_camel.lvl1)',
'unordered(hierarchy_radio.lvl1)',
'unordered(hierarchy_radio_camel.lvl2)',
'unordered(hierarchy_radio.lvl2)',
'unordered(hierarchy_radio_camel.lvl3)',
'unordered(hierarchy_radio.lvl3)',
'unordered(hierarchy_radio_camel.lvl4)',
'unordered(hierarchy_radio.lvl4)',
'unordered(hierarchy_radio_camel.lvl5)',
'unordered(hierarchy_radio.lvl5)',
'unordered(hierarchy_radio_camel.lvl6)',
'unordered(hierarchy_radio.lvl6)',
'unordered(hierarchy_camel.lvl0)',
'unordered(hierarchy.lvl0)',
'unordered(hierarchy_camel.lvl1)',
'unordered(hierarchy.lvl1)',
'unordered(hierarchy_camel.lvl2)',
'unordered(hierarchy.lvl2)',
'unordered(hierarchy_camel.lvl3)',
'unordered(hierarchy.lvl3)',
'unordered(hierarchy_camel.lvl4)',
'unordered(hierarchy.lvl4)',
'unordered(hierarchy_camel.lvl5)',
'unordered(hierarchy.lvl5)',
'unordered(hierarchy_camel.lvl6)',
'unordered(hierarchy.lvl6)',
'content'
],
distinct: true,
attributeForDistinct: 'url',
customRanking: ['desc(weight.pageRank)', 'desc(weight.level)', 'asc(weight.position)'],
ranking: ['words', 'filters', 'typo', 'attribute', 'proximity', 'exact', 'custom'],
highlightPreTag: '<span class="algolia-docsearch-suggestion--highlight">',
highlightPostTag: '</span>',
minWordSizefor1Typo: 3,
minWordSizefor2Typos: 7,
allowTyposOnNumericTokens: false,
minProximity: 1,
ignorePlurals: true,
advancedSyntax: true,
attributeCriteriaComputedByMinProximity: true,
removeWordsIfNoResults: 'allOptional'
}
}
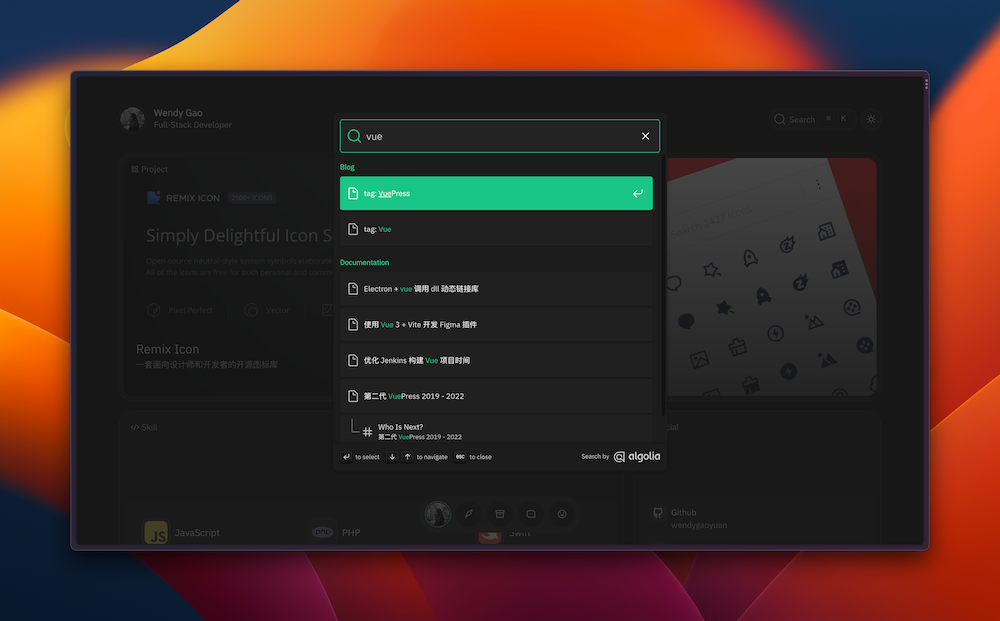
})最终效果
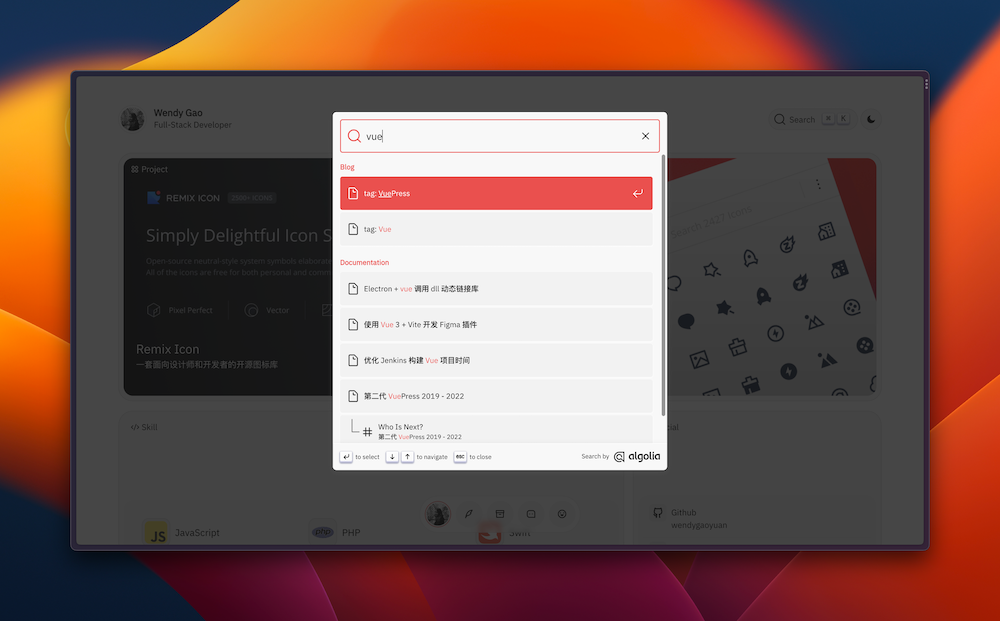
InstantSearch
InstantSearch 是一个开源的 UI 库,支持各大前端框架,内置很多 UI 组件,包括上面 DocSearch 里使用的 Autocomplete。
推荐直接使用它的UI 组件,扩展一下修改部分 DOM,当然你也可以创建自己的组件。
所以相较于 DocSearch 定制化更强一些。
创建索引
不同于 DocSearch 的爬虫抓取,这里你需要自己准备并上传数据。
创建一个 索引 index,我这里直接用的网站域名。
进入设置,就能看到后面需要的 appId、appKey 等配置。
安装 hexo 插件
我找到了两个 algolia 的插件。
hexo-algolia: thom4parisot/hexo-algolia
hexo-algoliasearch:LouisBarranqueiro/hexo-algoliasearch
两个插件使用逻辑都差不多,只不过搜索的索引范围不同。

hexo-algoliasearch 可配置项更多些,更重要的是可以截取文章内容做搜索,🤔 一般人都会搜索内容更多些吧,所以我这里就选用了 hexo-algoliasearch。
# 安装依赖
yarn add hexo-algoliasearch
在项目根目录的 _config.yml,添加配置项
algolia:
  appId: appId
  apiKey: apiKey
  adminApiKey: adminApiKey
  indexName: gaoquanquan.com
  chunkSize: 5000
  fields:
    - content:strip:truncate,0,60
    - excerpt:strip
    - gallery
    - permalink
    - slug
    - tags
    - categories
    - title
上传数据
创建一个 scripts ,用于上传数据
{
  "scripts": {
    ...
    "algolia": "hexo algolia"
  },
}
进入后台如果索引下有数据则成功。
构建 UI
如果使用的是一些已经接入 algolia 的主题模板比如,next 或 butterfly ,再根据主题说明启动搜索配置就结束了。他们主题的配置自行搜索,这里不再赘述。
我的博客主题是自己开发的,所以还需要手动添加 UI。
上面说了官方提供了很多 UI 组件,已经实现了功能,我们只需要修改配置和样式。
https://www.algolia.com/doc/api-reference/widgets/instantsearch/js/
https://www.algolia.com/doc/guides/building-search-ui/installation/js/
一个简单的示例,在主题目录的 _config.yml,添加配置项
PS.样式自行添加
algolia_search:
enable: true
hits:
per_page: 6
languages:
input_placeholder: 咦,在找什么
hits_empty: '啊哦,没有找到你想要的耶'
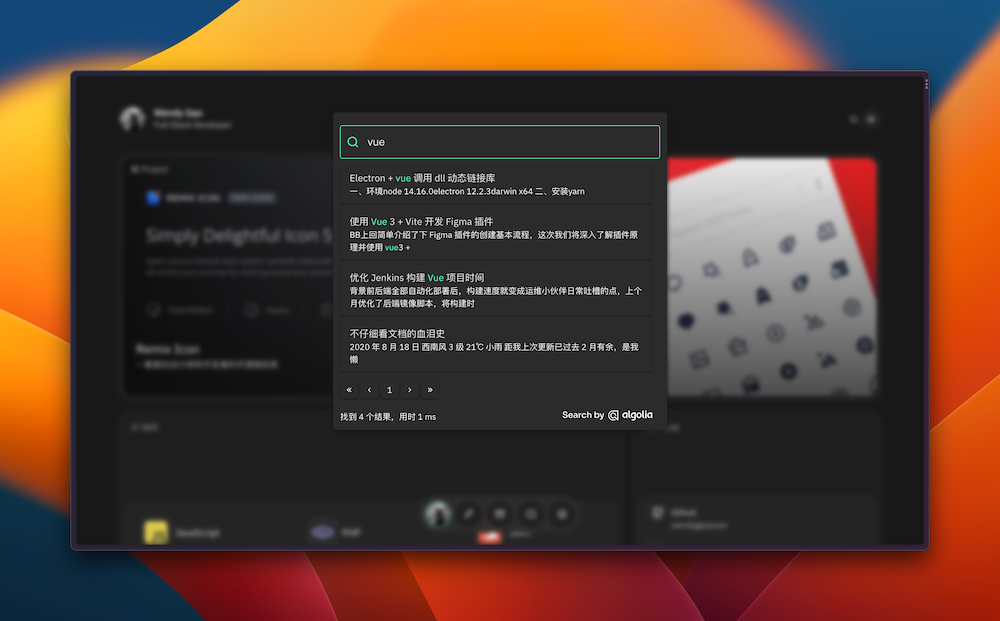
hits_stats: '找到 ${hits} 个结果,用时 ${time} ms'以下代码同样需要根据具体主题和 layout 自行动态调整。
if theme.algolia_search.enable == true
	#algolia-search
        .search-modal
            header
                i.ri-search-line
                #algolia-search-input

            #algolia-search-results
                #algolia-hits
                #algolia-pagination
                #algolia-info
                    .stats
                    .powered
        #search-mask
    script(src='https://cdn.jsdelivr.net/npm/algoliasearch@4.20.0/dist/algoliasearch-lite.umd.js')
    script(src='https://cdn.jsdelivr.net/npm/instantsearch.js@4.57.0/dist/instantsearch.production.min.js')
    script.
                var algolia = {
                    appId: '!{ config.algolia.appId }',
                    apiKey: '!{ config.algolia.apiKey }',
                    indexName: '!{ config.algolia.indexName }',
                    hits: '!{ theme.algolia_search.hits }',
                    languages: {
                        input_placeholder: '!{ theme.algolia_search.languages.input_placeholder }',
                        hits_empty: '!{ theme.algolia_search.languages.hits_empty }',
                        hits_stats: '!{ theme.algolia_search.languages.hits_stats }',
                    }
}$(function () {
$(document).ready(function ($) {
const openSearch = () => {
$('body').css({
width: '100%',
overflow: 'hidden'
})
$('#algolia-search').fadeIn(200)
setTimeout(() => {
$('#algolia-search .ais-SearchBox-input').focus()
}, 100)
// shortcut: ESC
$(document).on('keydown', function (event) {
if (event.code === 'Escape') {
closeSearch()
$(document).off('keydown')
}
})
}
const closeSearch = () => {
$('body').css({
width: '',
overflow: ''
})
$('#algolia-search').fadeOut(200)
}
$('#search-button').on('click', openSearch)
$('#algolia-search').on('click', (event) => {
const target = $(event.target)
const $modal = $('#algolia-search .search-modal')
if (!$modal.is(target) && $modal.has(target).length === 0) {
closeSearch()
}
})
const search = instantsearch({
indexName: algolia.indexName,
searchClient: algoliasearch(algolia.appId, algolia.apiKey),
searchFunction(helper) {
helper.state.query && helper.search()
}
})
const configure = instantsearch.widgets.configure({
hitsPerPage: 5
})
const searchBox = instantsearch.widgets.searchBox({
container: '#algolia-search-input',
showReset: false,
showSubmit: false,
placeholder: algolia.languages.input_placeholder,
showLoadingIndicator: true
})
const hits = instantsearch.widgets.hits({
container: '#algolia-hits',
templates: {
item(data) {
const link = data.permalink ? data.permalink : root + data.path
const result = data._highlightResult
const content = result.contentStripTruncate.value
return `
<a href="${link}" class="algolia-hit-item-link">
${result.title.value || 'no-title'}
</a>
<p class="algolia-hit-item-content">${content}</p>`
},
empty: function (data) {
return '<div id="algolia-hits-empty">' + algolia.languages.hits_empty.replace(/\$\{query}/, data.query) + '</div>'
}
}
})
const stats = instantsearch.widgets.stats({
container: '#algolia-info > .stats',
templates: {
text: function (data) {
const stats = algolia.languages.hits_stats.replace(/\$\{hits}/, data.nbHits).replace(/\$\{time}/, data.processingTimeMS)
return `<hr>${stats}`
}
}
})
const powerBy = instantsearch.widgets.poweredBy({
container: '#algolia-info > .powered'
})
const pagination = instantsearch.widgets.pagination({
container: '#algolia-pagination',
totalPages: 5,
templates: {
first: '<i class="ri-arrow-left-double-line"></i>',
last: '<i class="ri-arrow-right-double-line"></i>',
previous: '<i class="ri-arrow-left-s-line"></i>',
next: '<i class="ri-arrow-right-s-line"></i>'
}
})
search.addWidgets([configure, searchBox, hits, stats, powerBy, pagination])
search.start()
})
})最终效果
PREV
在 SwiftUI 中使用自定义字体
NEXT